Thursday, October 27, 2011

Reorganizing

So, I am not entirely fond of cleaning, but I do LOVE to organize. I find it endlessly therapeutic.

Let's start with my office.

I considered buying chalkboard paint and painting a square of it on my office wall, but that option seemed too costly and time consuming. Instead, I found this awesome item at Learning How. 

It's adhesive chalkboard material! It came in purple and blue. Blue matched my office better, so I went with it. I didn't want the edges to look awkward, so I bought cute, paisley borders to outline the edges of my sticky chalkboard. Genius, I know. 
You can find some of these adhesive chalkboard squares on Amazon; just click the link :)

 Yeah, yeah, yeah, I know that none of my furniture is made of the same wood. Whatever! I have no shame. Maybe one day I'll find the time to sand it all down and paint it one color; of course, that would be pretty boring.
     Anyway, the tall shelf on the right is my "need to read" bookshelf; I organized all of the books by author's last name.
     The tiny desk in the middle is my "wedding project" desk. It houses all of the materials I need to work on the wedding scrapbooks I am making for my mom, mom-in-law, and two aunts. Also, if anyone ever needs a workspace in my house (say, a niece or nephew), that little desk will do just fine. Honestly, people are lining up to work in my office. True story.
     That photograph in the middle of the wall? A previous student of mine took that photo, blew it up, and framed it for me. It inspired the green accent wall.
 The curtains? Pier 1...on sale.

The little shelf to the left of my filing cabinet? It houses all kinds of paper.

The drawers to the right of the filing cabinet? They house stickers, project ideas, cards/letters to save, and other nondescript items.

Like my teacher blanket? I've had it since elementary school!

Okay, see the shelves on the wall? I like what I did with these. The top shelf holds all of the books that I've read as well as useful anthologies from college. The bottom shelf holds all of the novels/plays that I teach during the school year. Since I know the books on these shelves pretty well, I don't need them as close to my desk.
 And now for my favorite part: my desk nook. I place the desk here for a few reasons. One, it's under a set of easily accessible shelves. Two, it's not blocking the window. Three, it has the perfect view of the hallway, where people usually linger to talk to me. When I say people, I really mean Jeff and the dogs. 

Anyway, the shelves above my desk have a very specific method of organization. On the top shelf, I placed all of the teacher reference books and children's books that I don't need very often. On the middle shelf, I placed teacher reference books for reading (some poem anthologies/reading strategies books/etc.). Finally, the bottom shelf houses all of the teacher reference books about writing; I use these books the most often, so they're the closest to my workspace. Admittedly, I'm lazy once I sit in that office chair. I don't want to get up and down a million times just to grab a book. So, I made everything that I use the most as easily accessible as I could. Mission accomplished. 


I can hear you now: "Danielle, you're posting about organizing, yet you're throwing a random picture of your kitchen, not your office, onto this blog post? What's wrong with you?" The answer is simple: I completed both of these projects in the same day, so they deserve to fall into the same post. Yes? Yes.

Anyway, so what does this picture have to do with organizing? WELL, I'm glad you asked. 

Problem #1: I hate knick-knacks. They take up space that something useful could be filling. When I say knick-knacks, I mean little figurines and such. You know what I mean, right? Those little angels, or those little chickens, or those little boots? What does that mean, you wonder? I didn't want trinkets on the top of my cabinets. I wanted purposeful items to fill an empty space. Let's be honest. What else am I going to do with the top of my cabinets? Nada.

Problem #2: We have very few places, other than the walls, to hang wedding pictures. 

Solution? Print out some of my favorite wedding pictures and give them a home above the cabinets.

You might tell me that I need to dust the picture frames, but wouldn't I need to dust that area anyway?

As far as I'm concerned, problem = solved.


I hope you enjoyed basking in the glory of my office and cabinet tops.

Monday, October 24, 2011

Keeping Out Creepers

So, several months ago, Jeff had to take the night shift at his job. Naturally, based on my unnatural fear of being alone at night, I panicked. Our kitchen has a window above the sink, and this window had no covering, which means I'd worry about what was staring in at me from the pitch dark as I fixed my breakfast at 5:30 in the morning. I kept telling Jeff that I wanted curtains or blinds or ANYthing to block out the creepers' peepers. I'm aware that no one was staring at me, but I've watched one too many episodes of Criminal Minds not to be worried about the possibility.
See what I mean? Creepy.
You see, the only reason it took so long was that our kitchen window has one of those funky lengths that they make only valances for. And, as we all know, valances do not cover the length of any window; otherwise, they really wouldn't be valances. I was left with either finding the right size blinds (not too lucky in that department) or making my own. I had to make my own.

"Why is that a problem?" you ask. Well, I own no sewing machine. I did what any intelligent individual would do and I consulted Google for the answer: no-sew curtains. As with my gluten-free red velvet cupcake recipe, I found no instruction sheet I liked by itself, so I combined the "easier" elements of two. (I believe one was on HGTV's site.)

VERY IMPORTANT NOTE: If you plan to make no-sew curtains, please do not use no-sew glue. It's crap in a bottle and not even adhesive crap. Go with the strips of hem tape. Otherwise, your no-sew curtains will turn into hand-sewn curtains if you have no sewing machine like yours truly.

Anyway, I bought fabric that I liked. You can cut up an inexpensive table cloth from Marshall's/Home Goods/wherever, but I found fabric that I really wanted at JoAnn's. Here's how I'd do it with the hem TAPE (not the stupid, craptastic glue).

Materials:
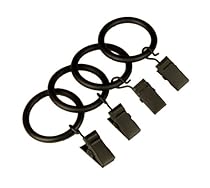
Meet the curtain rings with clips.
  • Curtain rings with clips
  • Hem tape (can be found in craft stores or craft sections)
  • Iron 
  • Scissors
  • Needle & thread (just in case)
  • Curtain rod (obviously)
  • measuring tape
Directions:
  1. Jeff installed the curtain rod because he's tall, and that's what guys like to do. 
  2. I measured the window (taking into account that I'd need to measure from wherever the curtains would start, which wasn't necessarily at the top of the opening)
  3. I measured one side of the fabric and cleaned up the ends by sewing them under (after having failed miserably at trying to use the no-sew glue). At this point, YOU, the smart person that you are, would be attaching the hem tape, sticky side down, to the back of the curtain and ironing the hem in place.
  4. Once I made one curtain, I measured out the other side, leaving enough room to tuck under and sew (again, you'd be ironing the sticky hem tape and saving yourself time) so that this side was exactly as big as the other side. I feared that I'd make both sides at once and one side would be smaller than the other, so I used the first one as a template for the second one. 
  5. Once all of your untidy hems are neatly sewn (ahem, ironed in place), attach the rings with clips to the top of your curtains and hang them on your curtain rod. Tada!
I know that creepers can still be outside of my window, but if I can't see them, then they don't exist.

Sunday, October 23, 2011

Clipless Curling Iron

So, I love to experiment with my hair. Many people have complimented certain styles that I wear, so let me show you two videos that helped me.

I figured out the clipless curling iron on my own, but here's a great video that helps you achieve the look you want.

Okay, when I have no time to do my hair in the morning, and I'm not feeling the curly style, this is my go-to 'do. Everyone always loves it. My co-teacher calls it my YouTube hair because I always tell people, "I learned how to do it on YouTube."

Remember that YouTube is not just a site to visit for music videos. You can learn how to do all sorts of things from instructional videos on this site. Thanks to YouTube, my husband learned how to tie a double windsor knot (for his tie), tie a bow tie, and a ridiculous number of other things. I typically use it for hair tutorials.

Oh, I have no pictures of me sporting my YouTube hair, but I do have a picture of my hair after I used the clipless curling iron on it.

(P.S. That awesome quilt behind me was made by one of my talented friends, Carol.)

I bought my clipless iron at Target for $24.99. Here is the link to it on Target's site:

(NOTE: It comes with a glove, and you NEED it; otherwise, you'll burn the dickens out of your hand. Trust me.) 

Gluten-Free, Chocolate-Free Red Velvet Cupcakes

So, before I had to go gluten-free, I LOVED red velvet cake. Once I had to go gluten-free, it took a long time to find a suitable red velvet recipe, especially since I'm also allergic to chocolate (crazy, right?). When gluten-free was just getting started, most of the baked goods tasted like I imagine cardboard would taste if you took a bite out of it. Any that did taste good included chocolate, which I couldn't eat, so I was up crap creek without a paddle on that one too. Luckily, gluten-free baked goods have improved quite a bit, which is great because I love my sweets.

Anyway, I found two recipes, one in my Living Without magazine (great magazine I found at my local health food store) and another on recipegirl.com. I didn't like either recipe by itself, so I combined elements from both and came up with the following recipe. If my husband, a non-sweet eater, enjoys these cupcakes, then they are clearly as delicious as I think they are. (I am beginning to wonder if my taste buds are still capable of discerning what non-gluten-free eaters will like, so I make him taste things.)
 
 (Pretty platter is from Crate & Barrel)
Ingredients:
     Cupcakes (makes 24)
  • 1/2 cup coconut flour
  • 1 1/2 cups all-purpose gluten-free flour (I use Gluten Free Pantry)
  • 2 tablespoons carob powder
  • 1/4 teaspoon sea salt
  • 1/4 teaspoon baking soda
  • 1/4 teaspoon xanthum gum 
  • 1 teaspoon powdered sugar
  • 1 cup coconut milk
  • 4 large eggs (all recipes call for this, but I used just egg whites; egg yolk upsets my stomach)
  • 2 tablespoons vanilla extract (mine is alcohol-free)
  • 2 tablespoons Canola oil
  • 1 teaspoon apple cider vinegar
  • 1/2 cup agave nectar (I used Blue Agave)
  • 3 drops red food coloring (I just opted not to use it)
     Cupcake frosting
  • 12 oz. cream cheese (you can certainly use the dairy free kind)
  • 1/2 stick of butter
  • 1 tablespoon vanilla
  • 1/4 cup agave nectar
  • 2 tablespoons coconut milk
Directions: (Preheat oven to 350 degrees F.)
  1. In a large bowl, mix all dry ingredients
  • 1/2 cup coconut flour
  • 1 1/2 cups all-purpose gluten-free flour (I use Gluten Free Pantry)
  • 2 tablespoons carob powder
  • 1/4 teaspoon sea salt
  • 1/4 teaspoon baking soda
  • 1/4 teaspoon xanthum gum 
  • 1 teaspoon powdered sugar
    2.  In a smaller bowl, whisk together the wet ingredients
  • 1 cup coconut milk
  • 4 large eggs (all recipes call for this, but I used just egg whites; egg yolk upsets my stomach)
  • 2 tablespoons vanilla extract (mine is alcohol-free)
  • 2 tablespoons Canola oil
  • 1 teaspoon apple cider vinegar
  • 1/2 cup agave nectar (I used Blue Agave)
  • 3 drops red food coloring (I just opted not to use it)
    3. Mix the wet and dry ingredients. I used a simple hand mixer even though I have a Kitchen Aid  
        mixer.

    4. Once all of the ingredients are mixed (shouldn't be watery; if it is, add a little more coconut 
         flour), I filled two cupcake tins (of 12 each). Each muffin cup should be 3/4 full of batter.

    5. Bake for 18-20 minutes. Stick a toothpick in the middle of the cupcake. If it comes out clean,
        your cupcakes are ready.

     6. While the cupcakes are baking and cooling, make the frosting by mixing all of the ingredients
         until the frosting is creamy (no lumps).

     7. Once the cupcakes are cool, spread the frosting on them.

NOTE: Since the frosting contains cream cheese, make sure you refrigerate these cupcakes!
Happy Eating!