Sunday, June 17, 2012

Walking in a Wardrobe Wonderland: Part 1

So, I have been cleaning out my closet (no reference to Eminem there) since 8 this morning; it is now 2:50. Why is it taking so long, you ask? Well, I am trying everything on and making outfits. I already have three huge bags of clothes I plan to yard sale. I developed some systems that might work for you when you clean out your closet. I'll just talk about the dress situation.

Dress Situation: I own a lot of dresses. When I go shopping and see a dress, my brain says, "OH! An outfit all by itself; how handy!" I then drag it home to find that there is no room for this dress, or it sits in the closet in spite of its splendor. I needed a remedy. Here's what I came up with:


  1. If the dress is a little too short for my liking, I see if it can either 
    • Work as a shirt (tuck it into a skirt that's a little longer)
    • Work as a beach cover up
    • Work with leggings or tights (many of these end up in the fall/winter collection)
  2. If the dress has a weird top half, but I still like the bottom half, I see if it can work as just a skirt (either cut off the top OR just throw another top over the dress). For one of my dresses, it had this weird tank top as the top half, but there was an elastic band separating the top and bottom. I cut off the tank top, and I had a skirt :)  
The blue "top" is actually a dress. For some occasions, it's too short. If so, I can just throw a knee-length skirt over it!
Here's the same dress with a yellow skirt. I'm really in love with this pairing.
Woo, this dress is much too short, but I LOVE it. I threw a fun black skirt over it, and ta da. Please don't mind my creepy pooch in the background. She has a staring problem. 


When I want to see whether or not I still think about an item of clothing, I put it in my office's closet. If I go back to it, then it's a keeper. It regains its residence in my bedroom closet.

However, some things I like, but I just haven't given them a fair chance. Today, I've given many of them a chance. I tried to pair them with something that I knew I already liked and wore. Here are some of my findings.

1. Blue sleeveless sweater (odd ball) with khaki skinny jeans (love 'em). I liked the pairing, but this sweater is still on probation.

 2. Blue tank top (odd ball) with standard brown/khaki shorts. I like this pairing too, but it's kind of boring. I need some ideas here.


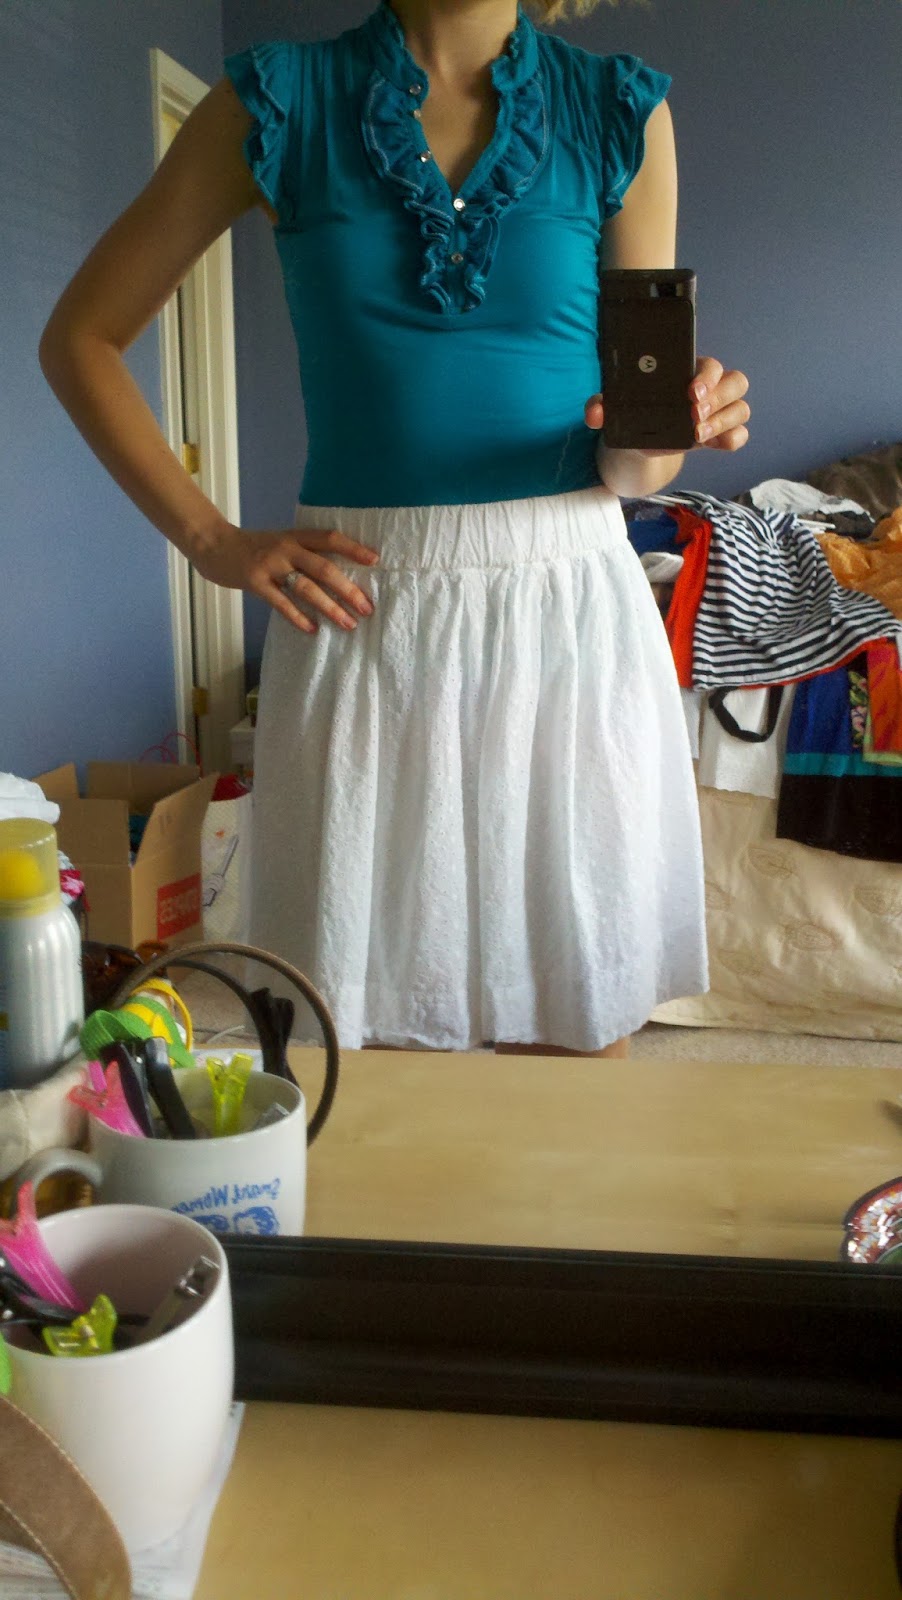
3. Teal shirt (odd ball) with my favorite white skirt. This teal shirt can still live because I really love it with the skirt. It's a keeper.

4. Blue and white blouse (odd ball) with standard navy blue shorts. This outfit works. I think I'll keep it.

5. Okay, this was the weirdest one. I kind of hated this top because it came with these weird jewels attached to it, but I couldn't seem to get rid of it. Today, I decided to take off the weird necklace/jewels (they weighed down the top of the shirt, which was uncool) and pair the shirt with a necklace that I love. BAM! I now love the top. It's so soft. Mmmm. 


6. Geometric tank top (very wonderful, silky fabric...ahhhh...but an odd ball) paired with good ol' white shorts and matching blue cardigan. Originally, the shirt was not tucked in. Once I tucked it in and added the cobalt blue belt, I loved the outfit. See? Some clothes just need a little extra thought. I feel nautical without wearing stripes, which is good considering I have WAY too many articles of striped clothing.


 7. Navy and white polka dot shirt (odd ball) with white shorts. This top has a weird cut. I think it might not survive, but I'll give it a month.

8. Teal shirt (odd ball) with favorite khaki skirt. This outfit makes me want to go to work.

9. Neither of these is an odd ball, but I wanted to shake it up. I like the cobalt pants with this shirt.

10. I revived this frock, and I'm quite glad that I did. It's comfortable, light, and quite perfect for the Bahamas.


11. I just decided to find out how many shirts could go with purple shorts. I liked this top the best.

12. These shorts needed a longer top. I do believe this one fits the bill. 


13. I was going to pitch this top, but I rather like it with this outfit. I'll see what else I can do with it. Still on probation. 


14. Revived this tube top. Not sure how I feel about the white flyaway cardigan. Big fan of the coral belt.

15. I think I like the top better with this cardigan. Maybe I'll try white shorts, black cardigan, this top, and the same coral belt. Hmmm. Off probation.

16. I liked 'em both, so I put them together. Really comfortable. How can I go wrong with red and white?


17. I'm on safari, and I'm never coming home. (No, I'm not already standing in my bedroom.)


18. Without the jacket...

19. A little boring with brown shorts

20. Brown shorts, you still stand a chance. 


21. These pants still stand a chance, but they're sort of capris. I don't know how I feel about that. They're SO old. Maybe 10 years old, hahaha.

Have a favorite? Have ideas for better outfit pairings? Get any inspiration? I'm already inspired to finish cleaning out my closet. Thanks for joining me! 


Thursday, April 26, 2012

Spots and blue. Better than seeing spots in blue?

Perhaps I should clean my mirror before I take a self portrait? Nah, it makes the picture look vintage. Yeah, we'll go with that. 

Well, at least the mirror looks clean, and the shot is...artsier? Honestly, how the hell do I have friends? Oh, that's right. If I had friends, they would have taken the picture for me. Meh. 

Dirty mirror: came with the house
Blue skinny pants: Boscov's (don't.judge.me.)
Long Cardigan: LOFT (a year or so ago)
Skinny, adjustable belt: NY & Co. (the adjustable belt is a spiffy invention)
Black suede wedges: Target
Tank top: Old Navy 

Just for the record, quite a few people complimented my outfit, so it looks better in real life than it does in a dirty mirror. Also, it took me a solid month (maybe more...) to figure out how else to dress these pants. I was afraid of putting a bright color with them, seeing as how they're already bright cobalt blue. So, I decided that they needed something a bit more neutral. Today, I had a sartorial epiphany and here it is, cloudy and all. 

Would you pair these pants with anything bright? If so, what? 


Monday, April 16, 2012

We all live on a yellow submarine.

Terrible photo quality, and I'm sporting a 'fro. 
This pose is also not super flattering.
(Thanks, Mother Nature, for the bloating.)
Why the crap did I post it, you ask?
Well, look at those shoes! They need showcasing. 
I'm wearing the same yellow blouse here.

Where to find it

Blouse: NY & Co. 

Skinny jeans: American Eagle

Shoes: Naturalizer outlet 
(they have red, tan, cobalt blue, and black) 
They are ridiculously comfortable. 

Sunday, April 8, 2012

How the Zebra and My Bathroom Got Their Stripes


So, according to Emily Sohn of Discovery News, the main reason that zebras developed their stripes is to ward off attacks from virulent flies by reflecting light with their black and white pattern.

Now, my bathroom is not black and white striped nor is it even half as awesome as a zebra, but it ranks a close second and it even reflects light quite beautifully. Yeah?

My original inspiration came from the lovely couple over at Young House Love. Of course, those two are professionals as far as I'm concerned! I, on the other hand, am not a professional, and I had to tackle this feat independently. My husband refuses to paint unless it's spray paint. The turd. They include a wonderful tutorial on their blog, but I added some steps and tips that I felt were worth mentioning if you really aren't a super experienced painter.

Materials that I used:

  • Frog's tape (better than blue painter's tape)
  • Mini roller (a gift from the heavens)
  • Mini paint tray 
  • Two paint colors (one lighter and another one shade darker) with paint sticks
  • small paint brush (for corners and edges)


Step 1: Choose two colors. I like that they chose two lighter colors. I am hopelessly devoted to Behr's paint and primer in one, so I went with two of their colors. I already had a lot of leftover Pillar White from our bedroom paint job, so I used that as one of the two colors. I then went to Home Depot and found one shade darker, Aged Parchment (how fitting for me as an English teacher!)

Note: My bathroom is small. I really needed only one gallon of the base color and a pint of the other, but I just went with one gallon of each, just in case. Plus, I figured you could use white/cream for anything. I bought both in semi-gloss.

Step 2: If you like a really clean slate, take all hardware off of your walls. Then spackle and sand (I used 100 grit in the blocks) all of your holes. We had a lot of holes, thanks to Jeff's run-in with an unruly shelf. Ugh.

Note: If your bathroom is small with no windows, and you do not want to suffocate yourself or wear a particle mask, take off the door. I did this step by myself, and I am certainly no body builder. Just make sure that you start unscrewing the hinges starting at the bottom. If you start at the top, as I so stupidly did, the door starts to pop off while you're grunting and actually fake crying as you unscrew the bottom screws. Not a good situation. Either way, taking off the door was the best decision I made during this process. 

Step 3: Once all of the spackling, sanding, and nearly being killed by the door is complete, paint your walls the lighter color (for me, it was Pillar White). I also painted the ceiling and baseboards because they were another white, and I wanted a more unified look. I painted three coats because that's how I roll.

Step 4: Once the paint dries, measure from your ceiling to the top of the baseboard. The YHL couple says to

  • divide that number (mine was somewhere between 92 and 93, and the fractions nearly split my brain) 
  • by how many total stripes you want (I wanted 12) 
  • and subtract one (so I end up with 11). The minus one still confuses me. 
I ended up with eleven stripes, which I like because I started and ended with the same color. Either way, I wanted my stripes to be somewhere around 8" in height, so I made the math work in my favor. Don't ask me to explain the math. I teach English, not Math, for many good reasons.

Step 5: Mark off where you want your stripes. I did this with pencil marks, and because I'm neurotic, I proceeded to use a level to draw light lines around the room so that all of my lines would be straight. I did not want to do all of this work to wind up with slanted lines. Though this took a lot of patience (or insanity), I'm glad that I did it! Patience is a virtue, folks.

Step 6: Mark a P (for paint) inside all of the lines that you want to paint. (I knew I'd accidentally forget and then curse myself.)
See the P?

Step 7: Using painter's or Frog tape (we like the green Frog tape), you will complete this next, mildly complicated step.

  • Put tape on the OUTSIDE of the lines that you want to paint your darker color (see the darker ones that I painted? The tape lets me know to paint in between those two strips of tape.)
  • Put tape on the INSIDE of the lines that you do not want to paint (see how the parts that I did not paint are thinner than the ones I did paint? You already painted this color as your base coat, so you do not want to paint it again.)
  • The wider boxes will remind you to paint them, and the thinner boxes will remind you that the base coat is already the color that you want it to be.
  • Essentially, you're just trying to mark off all of the spots that need to be painted.   

Step 8: Paint all of your wider boxes/lines (whatever you'd like to call them). I did three coats, and I used a mini roller. I painted the lines with my mini roller and then did the corners with a small paintbrush so that I could start my second coat with the mini roller as soon as I did all of the corners with the paintbrush.

IMPORTANT NOTES:

  • Make sure all of your tape is flush with the wall so that no paint can seep in between it and the wall.
  • As soon as you finish your final coat, REMOVE THE TAPE. It makes your lines even and doesn't pull off paint/wall with it. Important. 
  • Be sure that you paint over the tape a little bit so that your line does not fade before it even gets to the tape. You want to paint so that the lines end up crisp and that there are no white spots showing through.   


See our old, ugly light fixture? Blech.

Up close, she's no prettier.


See our new fixture? She was only $45 from Lowe's. You can build your own light fixtures there!
I love that it makes a rain-like pattern on the wall :)

Here she is without the light on. Still lovely.

And one more.

These are vinyl tiles. They fake me out all of the time; I keep thinking that they're real tiles, but
they are WAY prettier than the original (no pictures, sorry), took little effort, and cost less than $20. 

Finish product of the wall. 


I hung a new mirror ($30 from Target), hung a new towel hook ($2 on clearance from Target),
spray painted the switch plates oil rubbed bronze, and bought a new soap dispenser ($7 from Target).

New rug ($13 from Target), new TP tower ($9 from Marshall's), and new floor ($18 from Lowe's)


Price Breakdown:

  • Aged Parchment paint $30
  • Pillar White paint ($0 because I already had it from 3 years ago)
  • Frog tape $5
  • Mini roller tray $2
  • Mini roller ($0--already had it)
  • 2.5 thin angle brush $9.50
  • Sanding stuff $6.27 (already had the spackle)
  • Light fixture $45 (including bulbs)
  • Mirror $11 (used a gift card to help cut the $30 cost)
  • Towel hook $2
  • Soap dispenser $7
  • Rug $13
  • Floor $18
  • TP tower $9
  • New cabinet knobs $7.50
  • New 1/4 rounds $1.18
  • ORB door stop $3
  • New carpet trim (other was gold and ugly) $6
TOTAL: $175.45 -- not too shabby for what feels like a brand new bathroom!

NOTES:
  • We'll also be installing the new faucet (we already had it, and it was on super clearance 3 years ago; I don't remember its price)
  • We'll also be visiting Ikea to put a shelf under and to the left of the mirror.

My outfit that day ended up matching the bathroom. I didn't realize it until I had left the house. HA.